My Northern Garden is being transplanted! I’m moving (with much help from local computer guru, Sean Hayford O’Leary) to http://mynortherngarden.com. The original site will continue to be available for some time, but the information will also be available in the new location with plenty of new posts about garden trends as well.
 Phase one of the monster snow storm hitting Minnesota and the rest of the Midwest this Christmas forced the postponement of some family plans for Christmas Eve, so I spent the day snow-blowing the driveway, baking cookies with my daughters, and admiring the snow shapes that form on the plants in the yard. After the next wave of snow hits (15 to 19 inches predicted for Northfield), I may not be able to see any of my perennials or even this birdbath!
Merry Christmas to all!
Posted in Uncategorized | Leave a Comment »
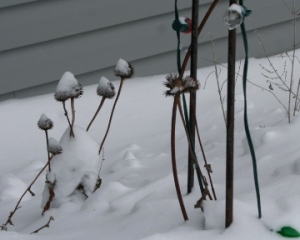 With as many new plants as I have this year, I was deciding whether to put some mulch around them. No need now! We got about 8 inches of new snow (my estimate) and lots of blowing and drifting during the storm that is still marching across the Midwest. As a result, my newest bed looks to be under about 2 feet of snow, and only the tops of these coneflowers are visible. They do look good in their caps, however.
A note about mulching plants in winter: The idea of mulch is not to protect a plant from freezing. Unless it is inappropriate for our zone, the plant can handle freezing without a problem. The purpose of mulch is to protect the plant from heaving out of the ground during the thaw-freeze cycles that we get throughout the winter. While the layers of snow on my plants could certainly melt over the next few weeks, exposing the plants to the worst of Minnesota’s winter and lots of thawing and freezing, it’s not likely given we are heading into the coldest time of the year in Minnesota. While blizzards are terrifically inconvenient (although my daughter and I will get our Christmas tree up and decorated today due to the day off from school), the snow is very welcome here.
Posted in Gardening Know-How, Seasons | 2 Comments »
 Judging by the decorations Northfield merchants are putting out for tomorrow’s Winter Walk — an annual shop, sing, meet, greet event that is enjoyed all but the city’s most Scrooge-like residents — the hot items in holiday container decorations are: spray paint, whimsy and lots of texture.
While taking photos downtown, I observed Mary Closner of Swag spray-painting away at her lovely blue and silver outdoor container. Inside the shop, she had last year’s Christmas tree on display. After it lost its needles, she had spray-painted it red. Cute! The stuffed ornaments from Sweden add a homey touch. The display outside the Northfield Historical Society also featured spray-paint as a stand-in for the snow we do not have yet.
 For whimsy, how about the little packages the folks at the Hideaway Coffeehouse and Wine Bar had tucked into their usual evergreen sentinels outside the store? That’s an easy decoration idea anyone with an evergreen and some ribbon could try.
Texture is everywhere, in the mixed greens in the pot outside of the Monarch, in the rough narrow branches festooned with pink lights outside of the Glass Garden, and in the more sedate and natural-looking pots outside of Buntrock Commons at St. Olaf, where the thousands of visitors to the St. Olaf Christmas Festival will get their lefse and lutefisk this weekend.
Posted in Uncategorized | Leave a Comment »
In this mixed up fall — August in September, November in October, October in November — you never know when the last day for gardening will occur. Here I was all set (perhaps even a bit eager) to call it quits, and along comes a pleasant weekend, so the jobs I was ready to not do, got done. The last of the pots were emptied and cleaned, the trimmed dogwood branches were taken to the Rice County compost pile (Northfield’s closed Nov. 15), and I watered all my new plantings one last time.
I even found an inventive way to get the hose wound up and put away. The hoses we have tend to get twisted, so I undid all the crimps and twists and laid the hose on the driveway (which is slightly angled) to drain. Then, standing in the garage so not too many neighbors would see, I put the hose at my waist and started turning around. Other than having to stop once because I was getting dizzy, the method worked wonderfully — the hose was carefully wound around my middile, it slid off in a neat circle, and it was easy to stow.
Posted in Seasons | 5 Comments »
This morning’s Minneapolis Star-Tribune brings news of the latest must-have item for survivalists. For $149, you can buy a canister filled with enough heirloom seeds to plant an acre of vegetables, enough to feed a small group of people for a year.
Several authors of a decidedly non-survivalist bent (if you want to use a crude red/blue, liberal/conservative yardstick) have written books on how to grow your own and the physical, emotional and spiritual benefits of doing that. My favorites are This Organic Life, by Joan Dye Gussow, and Animal, Vegetable, Miracle, by Barbara Kingsolver. Both books tell the story of how a family began to live off its own land — in Gussow’s case, a standard suburban lot. Last spring, Northern Gardener profiled a couple from Prior Lake, Mn., who fed themselves and three teen-age sons very well from a large vegetable garden. Obviously, you can grow much of the food a family needs on an acre or less.
What this survivalist seed offer seems to ignore, though, is that to “grow your own” you need a good deal more than seeds: You need knowledge, and lots of it. Most of the folks I’ve known over the years who are very self-sufficient grew up on farms, or they devoted considerable study to horticulture and animal husbandry as they gradually moved to a grow-you-own approach. To successfully garden on a largish scale (particularly post-apocalypse), you need to know when and how to plant seeds, how to sharpen and repair tools, how to make your own compost and build your soil, how to build fences to keep critters out of the garden, and, if you are an omnivore, how to keep and butcher chickens or other animals among many other things. Most importantly, you have to know how to process enough food to get you through the winter .
So, to any survivalists out there, I say, by all means, put down your guns and plant a garden — though you may be able to get a better deal on seeds than $149. Buy some canning equipment, too, and a dehydrator. Go to the library or a book dealer and pick up a couple of basic manuals on going it alone, such as the 1940s classic The “Have More” Plan or the more recent, The Backyard Homesteader. Enjoy yourselves, learn some skills, and you may find that whether the world ends or not, working in your garden has given you a healthier, happier life — and that’s a lot better than just surviving.
Posted in Musings | 4 Comments »
 I’m continually amazed at what plants will do to survive. Recently, while thinning out some overgrown red-twig dogwood, I came across this branch. The canes of red twig dogwood are fairly soft when they form and the bush grows essentially as a thicket, with branches on top of each other and sometimes criss-crossing each other, or as in this case, just making a nice U-turn to go around each other. We should all be so flexible.
Posted in Amazing Plants, Shrubs | Leave a Comment »


